Is Today the Day!

I have been trying to get several large chains to purchase my cutting boards. I’ve spent alot of time writing letters, sending emails and shipping samples. Only a couple of the stores that I have contacted have responded but were not interested. I had one store that I received a requested for a sample board. The sample got shipped earlier in the week. Several local shops are selling my boards which is nice.

maple and cherry end-grain cutting board, chopping block or butcher board

More pictures of my end grain cutting boards.

Since I love to cook I watch alot of cooking, baking and grilling shows, including the Food Network. I got the idea that would try to contact a few of the chefs so I send out some emails. I got one response today from Ina Garten, who is the chef on Barefoot Contessa. I am custom making her a board and hope to have it shipped next week. I sure hope she loves it and uses it on her show.

I handcraft each end grain chef cutting boards one at a time from maple and cherry in my shop. It is a great product that will last a lifetime and will look beautiful in any kitchen. Don’t you just love the look, the ramdon pattern of Maple and Cherry wood makes each board unique. It’s GORGEOUS! My boards are sure to be a converstaion piece at your next party. What a great way to display cheese with wine.

end grain chef cutting board

Maybe I am out of my league but I am determined to fine someone to sell my boards. Wish me luck!

Continue following this story… shipped the board to Ina This Week!

I’ve tried setting up a page on my blog so that everyone can see my boards. So they are officially for sale. Stop by our end grain cutting board page and check them out for yourself!

Bluebirds and Mealworms

It’s been more than a month now that I have been feeding mealworms to the bluebirds. At first it took me about a week to get them to the mealworm feeder. Initially I was using a tuna can on a small platform mounted on the side of my bluebird house post. Since then I have purchased a nice bluebird mealworm feeder from Birds Unlimited. This feeder is really nice, it has holes in the bottom of the cups to let water drain and it has a cover to keep out the sun and rain.

bluebird mealworm feeder

There are many other birds that are attracted to eating mealworms, they include, Robins, Wrens, Chickadees, Catbirds, Grackles, Woodpeckers, Grosbeakks, Sparrows, Brown Trhushers, Mockingbirds, Warblers, Finches, Orioles, Cardinals, Blackbirds and Nuthatches. There could be a few I missed.

Mealworms are available live and dried. I have been using live mealworms that I purchase from our local pet store. As you use more and more it can get expensive. After researching, I have now started raising my own mealworms and will plan on writing a blog on this later.

mealworm container from pet store

Last week I started moving the mealworm feeder pole closer and closer to the house two foot at at time. I am hoping to get the feeder in range for me to take some really nice pictures from the house.

For more information on bluebird houses, view more images or to order, click SHOP NOW

Shop Now

Blooming Hydrangeas

Home

We had a mild winter plus all the extra rain we have gotten this year the hydrangeas are absolutely beautiful. It has also extended the blooms as well as my hydrangeas are blooming a second time. Talk about rain, the local news shows we have gotten 51.7 inches of rain this year putting us 21 inches over our normal rain fall in a year, WOW!

blue hydrangea flower

My blue hydrangea plant is huge this year and loaded with blooms.

pink hydrangea flower

I love both the blue and pink hydrangeas. Over the years I have started rooted cuttings which has given me alot of plants plus a few to give away to family and friends.

Check out my garden Bluebird House Give-Away, it’s FREE!

See my Japanses Iris blooming.

My Work

Bluebird House GIVE-AWAY

I am hosting a Bluebird House Give-Away! The lucky winner will receive one of my unique handcrafted large Bluebird Houses.

male bluebird eating mealworms

Wouldn’t you love to have one of my Bluebird Houses in your garden? Your Bluebirds are sure to love it!

Here is how to enter:

One entry per person unless you also complete #4 and #5.

1 – Make a comment on this post about my handcrafted Bluebird House!

2 – Become a follower of Michael’s Woodcraft and Blog.

3 – Like Michael’s Woodcraft and Blog.

4 – If you would like multiple chances to win, your name will go into the drawing two more times if you post about the Give-Away and link back here to this post. Then post another comment letting me know the link where you  posted.

5 – If you purchase a cutting board, any size, your name will be entered two more times.

6 – If you are the winner, post on your blog you won with a picture of the Bluebird House and link back to my site. It would also be nice to get pictures from you of the Bluebird House in your garden.

The winner will be drawn randomly and will be announce on Monday, September 16th. The Bluebird House can only be shipped to a street address, we can not ship to a P. O. Box.

It’s important that I have a way to contact you by email, as I would hate for anyone to lose out because I couldn’t notify them. If your email address is not available on your own blog then please include it in your comments.

Bluebird House Give-Away is only open to residence of the United States lower 48 states.

I hope you win, Good Luck everyone!

rustic bluebird houses on front porch as decoration painted blue with tin roof

Learn more about my unique Garden Bluebird Houses.

Ostrich Ferns Gone Wild

Ostrich Ferns and Bishops weed

My Ostrich ferns have done extremely well this year and are absolutley beautiful! These ferns love a wet moist soil and this year we have had so much rain that they are loving it. The front of our house faces exactly North so I decided to planted six small clumps of Ostrich ferns across the front of the house two years ago. Mine are about 4 feet tall this year. Deer don’t like the Ostrich ferns so if you have deer around your place they won’t eat it. Last year they did grow well but this year they have gone wild.

ostrich ferns

In front of the Ostrich ferns you can see my Bishops Weed or also called Snow on the Mountain. The foliage is variegated and forms a quick, dense weed-proof carpet. In zone 6, I am able to grow the Bishops Weed in the shade and sun as long as it gets watered regularly and will grow 10″ tall.  It is fast growing and can be invasive. It grows from a rhizome and just a small piece will grow a new plant. Early summer clusters of white flowers on stems will appear.  You will often find Bishops Weed in hosta garden! It will also grow well under tress when nothing else will grow there.

bishops weed also called snow on the mountain

High on Siler Bald

Hello everyone. I am getting a late start on writing since my last post. With this post I am starting a new Hiking category. All my life I have hiked the Appalachian Trail (AT) and other trails throughout South Carolina, North Carolina Georgia and Tennessee. I love hiking to waterfalls and the more remote the better. Most of these have been day trips but a good many were over night stays. Today, I wanted to blog about one of my over night hikes to Siler Bald.

Siler Bald trail covered with snow

Siler Bald trail covered with snow

Siler Bald trail snow on trees

Siler Bald trail snow on trees

Siler Bald trail trees covered in snow

Siler Bald Trail with trees covered in snow


Back in January this year, a good friend and I had planned to hike the Mt. Le Conte trail n Tennessee and sleep over on the Appalachian Trail shelter at the summit. The day before our hike there was extremely bad winter weather on Mt. Le Conte. When I called the ranger station and asked about the weather they told me the trail was closed due to heavy snowfall. The Mt. Le Conte trail is a difficult trail and can be dangerous with all the snow. It is one of the absolutely most beautiful hikes you could do in Tennessee. If you have not hiked this trail you should check it out. We changed our plans and decided to hike Siler Bald from Hwy 64 just outside of Franklin, NC. This would normally be an in and out day hike but we decided to start late in the day and planned to sleep in the AT shelter. When talking to the ranger we were told that no one else had reserved the shelter so we didn’t expect anyone else to be there.

sunset---siler-bald

I have a Kelty Red Wing 50 back that I use for day and one night hikes. I packed light but I was still carrying nearly 40 lbs. The 40 lbs included, gloves, trekking pole, Cat’s Meow sleeping bag, ThermaRest pad, Alaska bear repellent, my Ruger 380, 2 water bottles, Katadyn water bottle with filter, one bottle of Gatorade, compass, matches, Yaktrax for my boots in case we had ice on the trail, GSI Snow Peak stove with fuel, freeze dried food, tea bags, a few pieces of candy, granola bar and crackers. Be sure to bring a trekking pole you will need it.

The Hike

Siler Bald is one of my favorite hikes; it is a really beautiful spot. This is a moderate to difficult hike but you will soon be rewarded when you reach the summit. Siler Bald is accessible from two different routes. We chose to start our hike at the trail head on Hwy 64 parking area. It was cold and snowing with temperatures around 22 degrees. The AT crosses Hwy 64 at this parking area. We started hiking the Winding Stair Gap Trail along the AT for Siler Bald with it snowing heavily. This is a 4.3 mile hike, nearly 9 miles round trip with an elevation change of about 1500 feet. The summit elevation is 5,216 feet.  The most difficult part of the trail is the final ascend to the summit.

Siler Bald snow on trail to summit

Siler Bald snow on trail to summit

Along the trail we saw a few rabbits and also spotted deer, raccoon, bob cat and bear tracks. This area is loaded with wildlife. Bears are very common in this area.
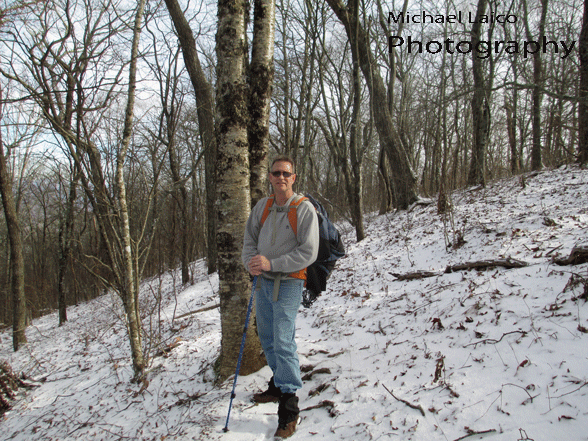
Me on AT trail to Siler Bald

Me on AT trail to Siler Bald


On The Summit

As we reached the final stretch to the summit, the snow had stopped but the wind was blowing. I realized that the clouds had lifted, the sun was out and the sky was clearing. When we reached the summit it was pretty chilly. I have a temperature gauge that hangs from my back pack and it registered 20 degrees. It was colder than that with the wind chill so we decided to fix a cup of tea and have a snack before hiking to the shelter.

Siler Bald summit elevation marker

Siler Bald summit elevation marker.

Siler Bald summit 360 view of snow capped mountains

Siler Bald summit 360 view of snow capped mountains

Siler Bald summit 360 view of mountains

Siler Bald summit 360 view of mountains

Hike to the Shelter

The shelter is on a loop off of the main trail and is about a mile hike from the summit. We arrived at the shelter and immediately started gathering as much fire wood as we could before dark. With all the snow we had a hard time finding dry wood. We soon got a nice fire going and before we knew it was time to cook supper. Temperatures during the night reached 9 degrees. We had a couple of raccoons visit the shelter looking for food but we had tied our packs up high enough that they could not reach them. The next morning we fired up our stoves, ate breakfast and started back down the mountain.

This is a great hike, be sure to bring your camera for some great shots at the summit!

Please leave comments, especially if you have hiked this trail and if you have not, you  need to, it’s a great hike!!

Michael

Growing Seedless Grapes

neptune seedless grape bunches on the vine
Neptune Seedless Grapes

Two years ago I purchased three table grape vines. I spent hours using a manual post digger, installing the post, mixing concrete and then installing the wire between posts. Once the trellis was done, I started work on digging the holes for the vines. The grower had sent me instructions for digging the holes and the soil requirements by email before the vines arrived. Digging the holes took me awhile; it was suggested to dig the hole 4 feet deep and 3 feet in diameter, so I did.

After getting the three holes dug, I started working on the soil mixture. This was easy compare to all the other work. Now I was waiting for the grape vines to arrive. I had purchase seedless table grapes, one of each, Mars, Neptune and Red Flame. I select these because they are supposed to do well in my area, zone 6 in South Carolina.

Mars is a blue seedless slip skin, has large fruit that is very sweet. Mars grapes are good for making jam, wine and jelly. Neptune pictured above, is a yellow-green seedless grape and has large clusters. Very sweet medium size fruit, Red Flame is a red seedless grape. Very popular in our area and is also sweet with medium size fruit. Mars fruit ripens first in mid-July and the others ripen about 25 days later.

I purchased 3 year vines for Mars and Neptune, 2 year vine for Red Flame back in 2011 hoping that the larger plants would give me fruit by 2013. I let Mars and Neptune produce fruit this year, trimming back 50% of the fruit but the vines were still full.

I am very pleased with the vines, their growth and it was a lot easier than I thought. Neptune had more grapes than Mars, it’s so nice to go into the yard and pick your own grapes. I can’t wait till next year!